How much did they contribute to ending the First World War?
Australia’s contribution to the war on the Western Front in 1918 is difficult to pin down. In one sense the efforts of the Australian Corps, when mapped among the massive allied gains all along the front, is a mere drop in an ocean of vast military endeavour. And yet, beginning with John Monash’s published memoir, The Australian victories in France in 1918, claims have been made that the Australians punched well above their weight when it came to the battles of 1918.
As summer came around each year on the Western Front, a campaign was launched by the allies. In 1916 that campaign became the battle of the Somme; in 1917 the British campaign was the battle of Third Ypres, known as Passchendaele. Launched on 8 August 1918 with the battle of Amiens, the campaign of 1918 would become known as the Hundred Days Offensive. It had been delayed by the German Spring Offensive, but although the German advances sorely tested the allied defences, the line did not break and the Germans could not pour through. Instead, their advance gradually slowed to a halt as overstretched supply and communication lines tested the military discipline of the German Army.
Even as this was happening, plans for Amiens were being laid. A series of conferences were held, involving Field Marshal Sir Douglas Haig, Sir Henry Rawlinson, commander of Fourth Army, and eventually all relevant commanders including Monash and Lieutenant General Sir Arthur Currie, commander of the Canadian Corps. Currie was a successful commander in the manner of Monash. He too believed strongly in the value of fire-power and was meticulous in his planning, encouraging discussion by specialists and listening to all suggestions in the planning phase. The battle of Amiens was a joint operation under the general direction of Rawlinson and Fourth Army staff, but the commanders of the Australian and Canadian Corps were the key actors in the execution of the operation.

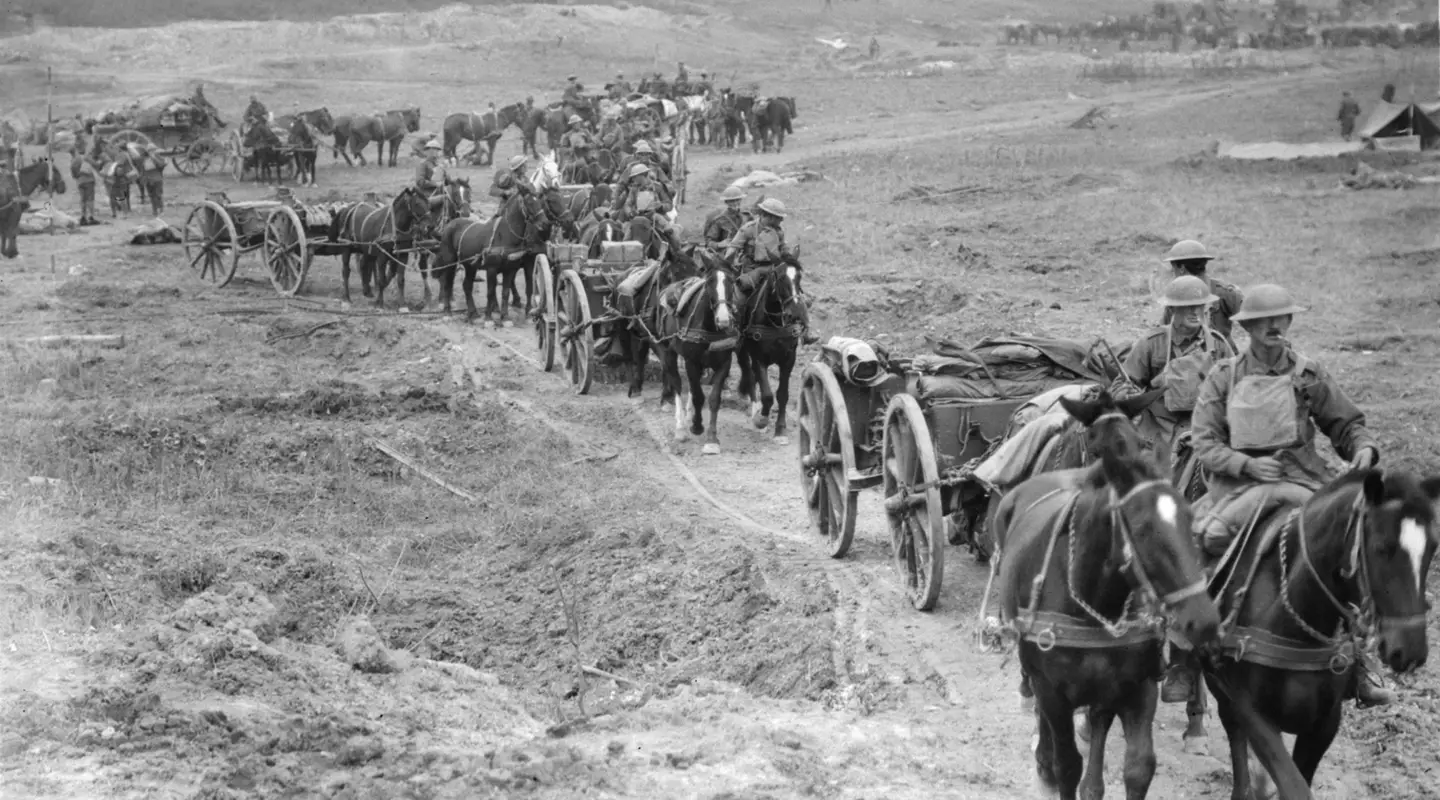
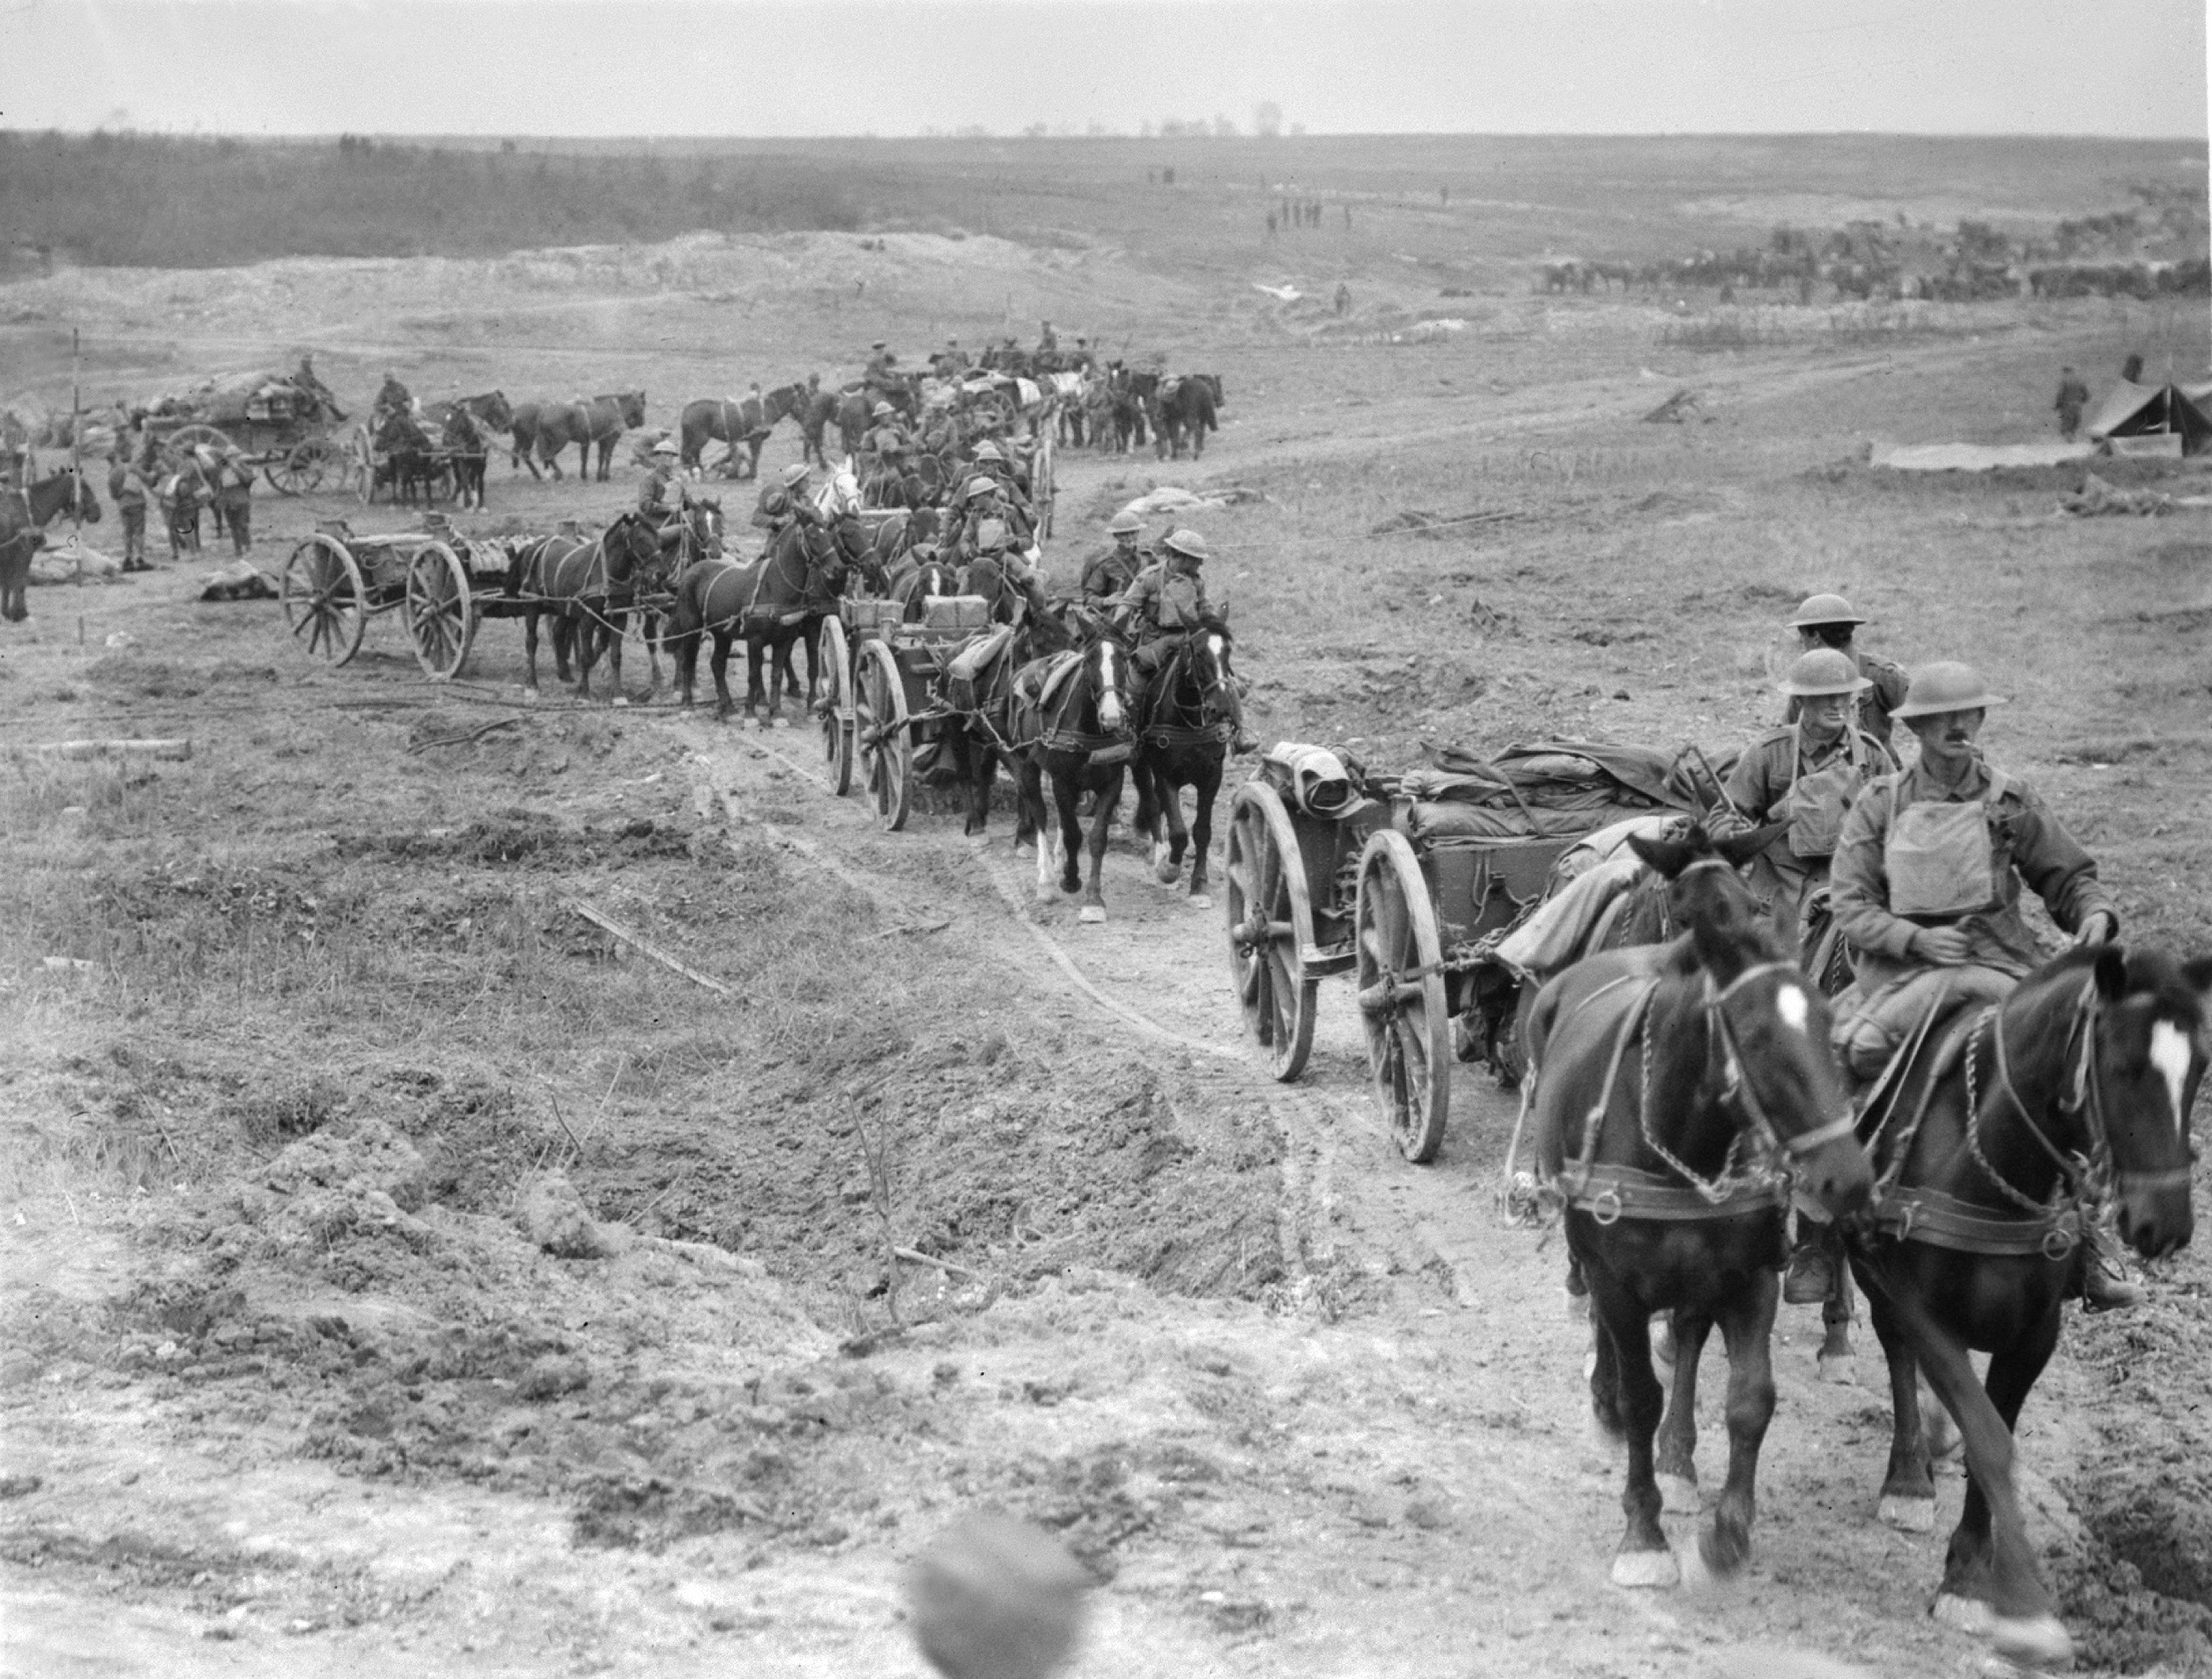
By October, the line was in constant movement, so teams like this were always in demand to bring supplies and ammunition forward, then take wounded back.
Weaponry
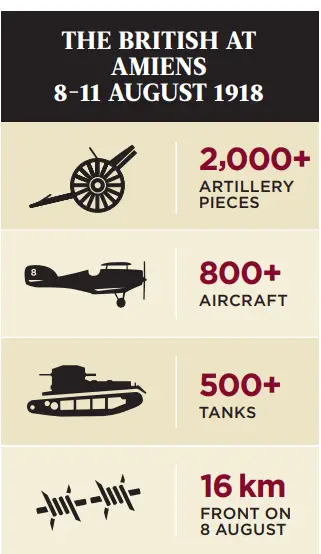
Amiens was war on a massive scale, making the most of the opportunity to seize the initiative from the Germans. Divisions of infantry – tens of thousands of men – leapfrogged through each other to take a staggered series of objectives. More than 2,000 artillery pieces, 800 aircraft and 500 tanks – every tank available to the British – were amassed to ensure the best chance of success. The initial attack on 8 August was launched by four corps across a front of ten miles (16 kilometres). As much weaponry as the British could spare would be used in those ten miles.
At the same time, battle plans took advantage of the most recent advances in the technological application of weaponry. Two years before, it would have been unheard of to launch a battle without a preliminary barrage; but by 1918 the guns were registered (homed onto targets) with a minimum of shots, and aimed at German artillery batteries accurately located by field survey battalions using modern methods such as sound-ranging and flash-spotting. Tanks had found their most effective place on the battlefield – under the barrage, alongside the infantry – and aircraft could communicate with the ground more effectively than ever before.
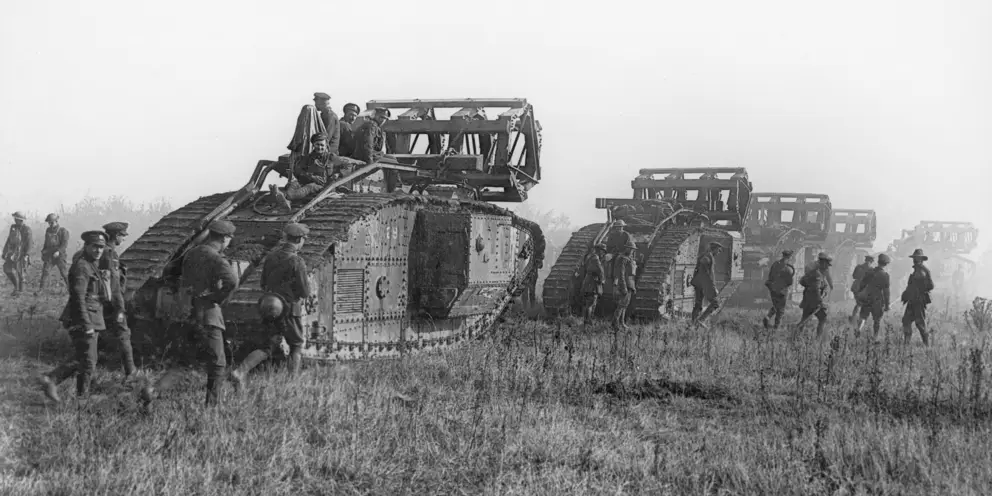
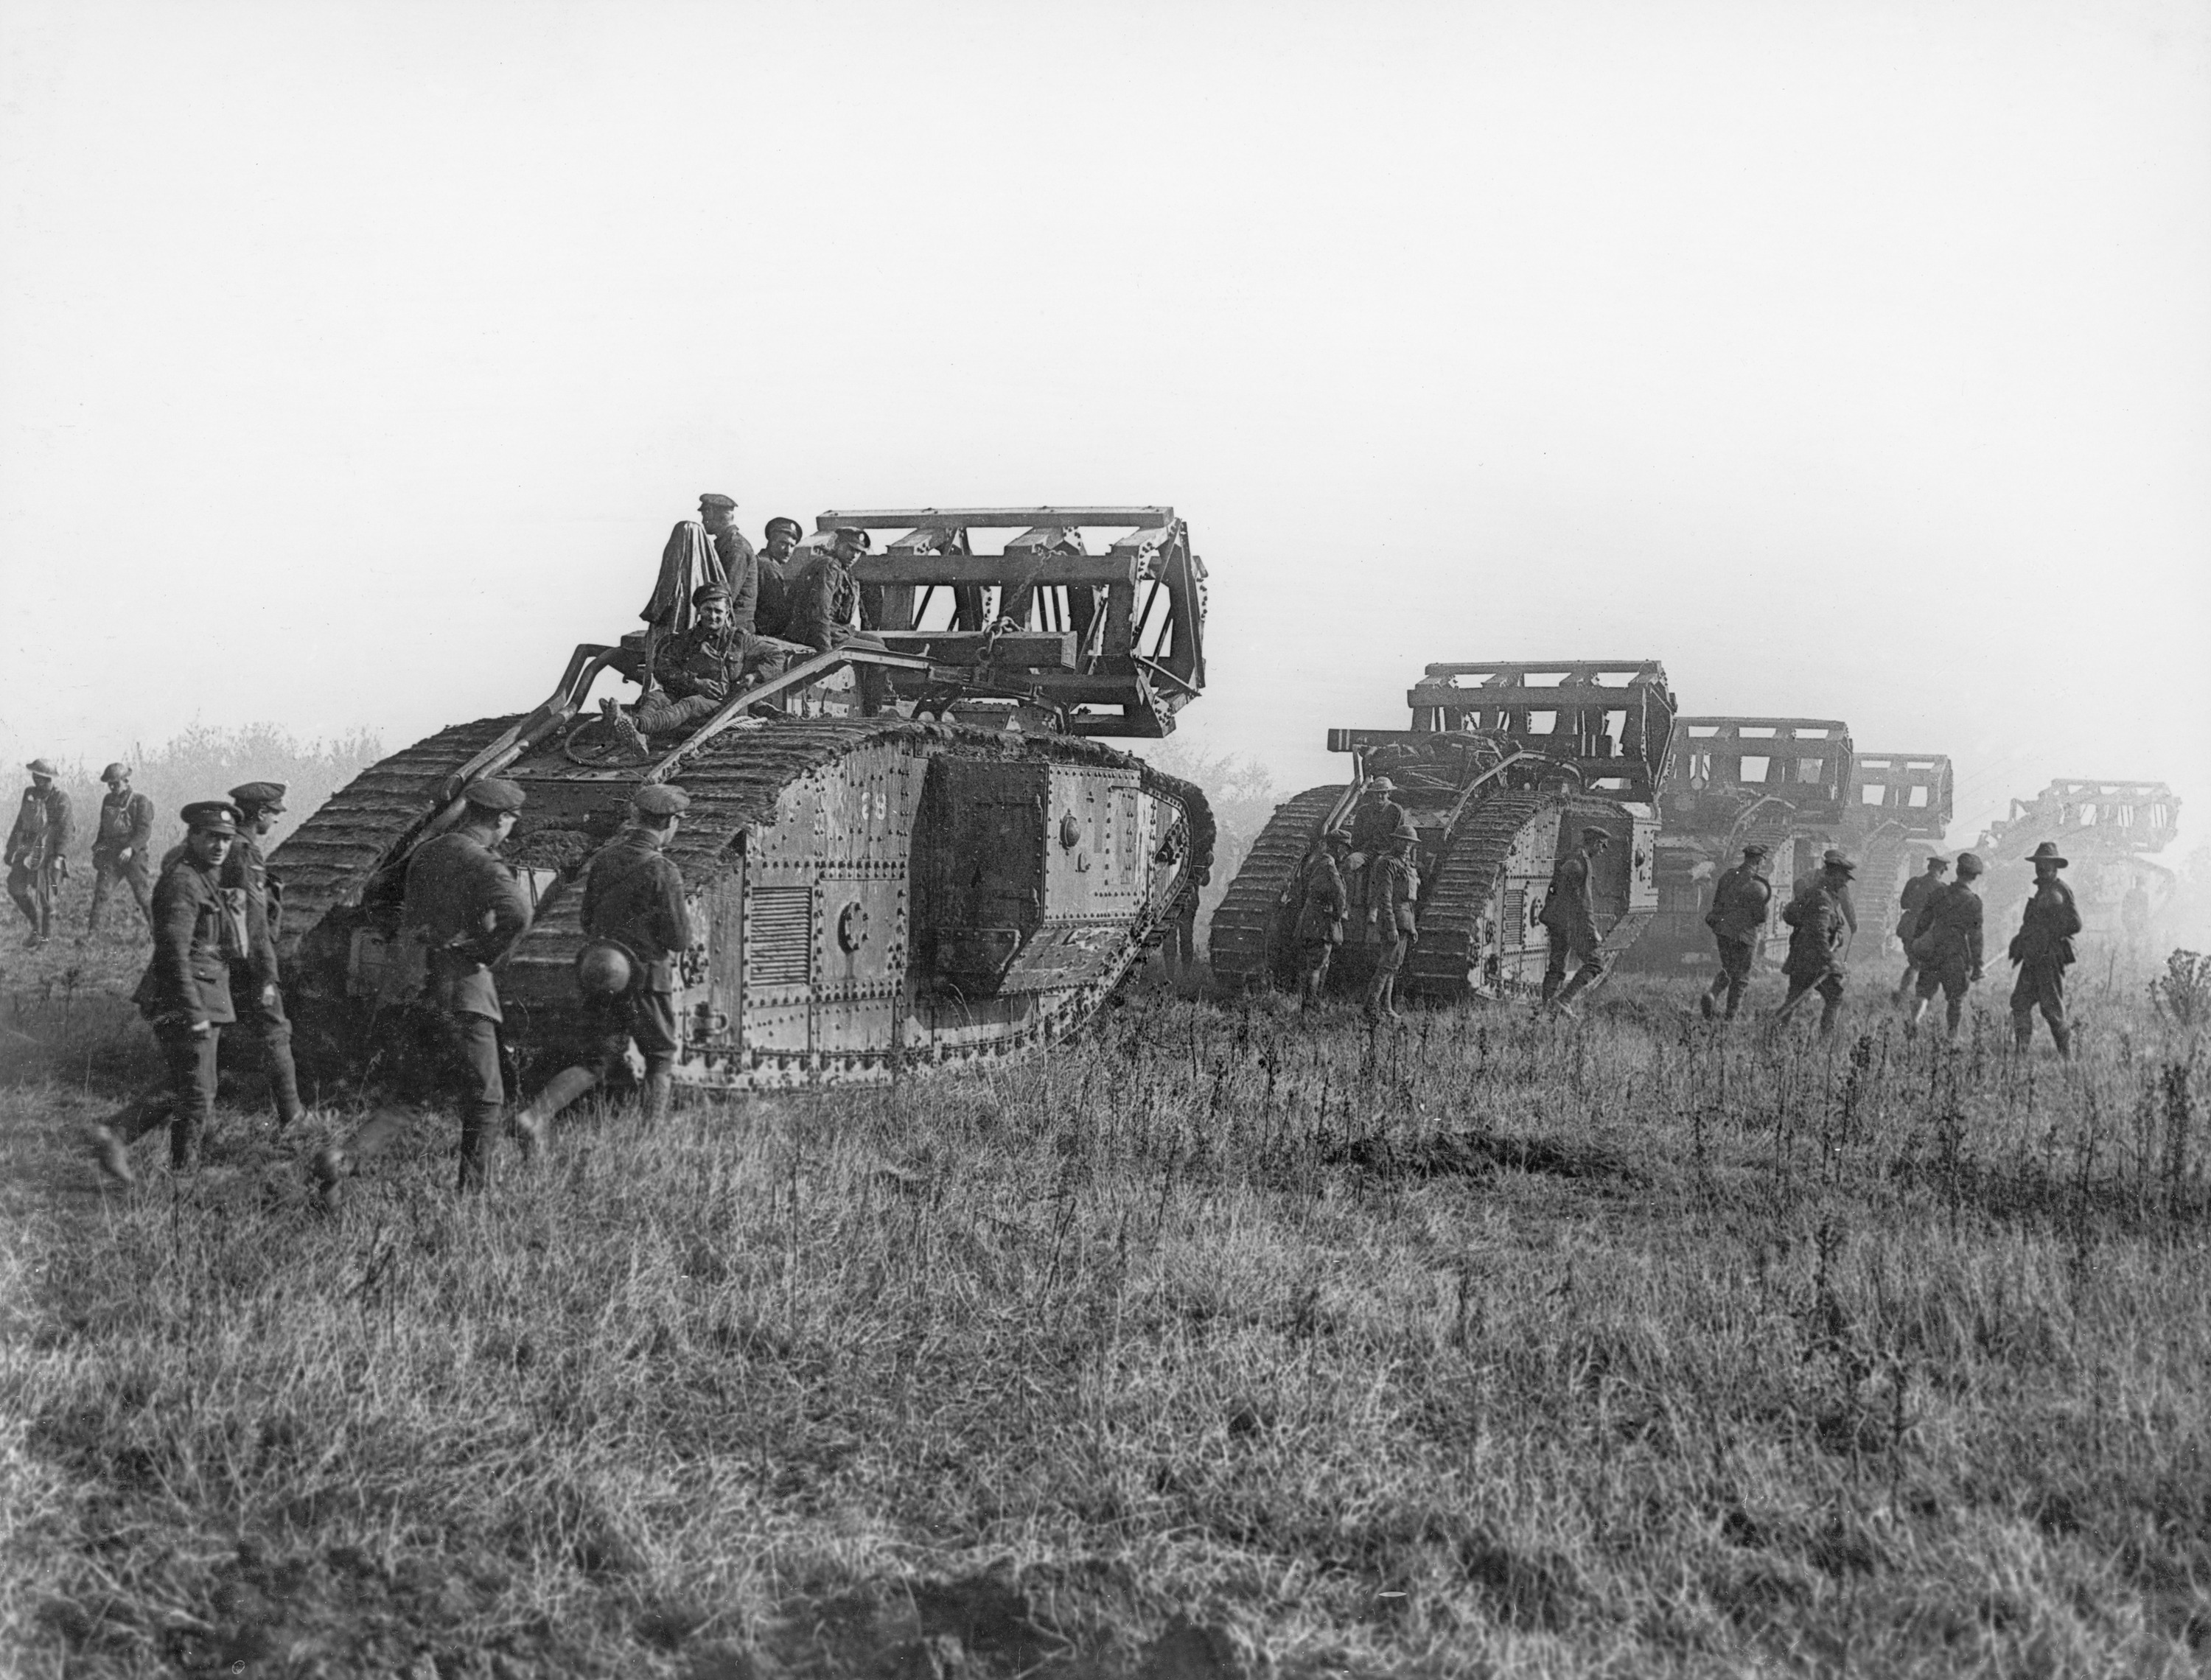
Tanks moving forward in preparation for an attack against the Hindenburg Line, 29 September 1918.
The Australian Corps went into Amiens alongside the Canadian Corps, the two dominion formations forming the spearhead of the operation. It began at 4.20 am on 8 August 1918, under cover of fog so heavy that in places infantry sections could not see their neighbours, and even resorted to holding hands to maintain contact. However, the counter-battery work of the artillery had been so effective that few, if any, German guns were still firing in an attempt to slow the advance. Nor could defensive machine-guns have much impact in the fog, and once it lifted, tanks made short work of German machine-gun nests.
The sheer volume of weaponry, together with its careful and deliberate combination, meant that the Australian and Canadian Corps were able to push forward further than had previously been thought possible. Their advance was so great that it could be measured in miles – eight for the Canadians and seven for the Australians [13 and 11 kilometres]. The two corps on either side of this spearhead force also made enormous territorial gains. What was notable about Amiens was that both Monash and Currie recognised that their men needed to stop after this advance and consolidate their gains before moving on. They urged Rawlinson and Haig to give the order to halt, and the higher-level commanders listened.
From this point the Australians remained in the front line, continuing to advance. Sometimes the corps employed “peaceful penetration” tactics of earlier in the year, taking back small sections of the line a piece at a time with raiding parties and small patrols. At other times, larger scale operations were planned and put into effect. The line was inexorably forced away from Amiens and its all-important rail link to Paris. Even though by this point much of the German army was struggling to maintain morale, there was a will to continue to defend the line, and the weapons to do so. Monash continued his meticulous planning in every operation, no matter its size.
Training
Monash had the benefit of commanding an extremely professional army corps at this stage of the war. Even the lowliest private had been carefully trained in his role in an all-arms attack, with as much information given to him as possible for each operation. Should an NCO or officer be killed or wounded, there was invariably an Australian of lower rank able to fill his place competently and keep the operation moving. They were also very well aware of different components of the weapons system operating around them, and how artillery, gas, aircraft, tanks, machine-guns and mortars were variously used to get them to their objectives. Infantrymen themselves had access to firepower beyond their rifle and bayonet in the form of grenades and rifle grenades, and their platoon could expect to take at least two Lewis guns with them into battle. While the Australian soldier famously had an aversion to military discipline out of the front line, in battle the Australian Corps was a highly disciplined unit.
With semi- open warfare in place, rather than the static trench warfare of months and years gone by, the Australians had to adapt the combined arms system to suit different situations. At times a piece of the weapons system was missing – tanks were particularly scarce after 8 August – but the Australians were able to push the advance nonetheless. This was no more obvious than at Mont St Quentin, attacked on 31 August 1918. In parts of the attacking line, the slope of Mont St Quentin was too steep for an effective infantry barrage. Knowing this was a significant problem, the 2nd Australian Division replaced the overarching firepower of the artillery with rifle grenades, using an impromptu barrage to fill gaps in their protective firepower to storm the heights overlooking Péronne. Although they were pushed off the crest by a German counter-attack, they retook it the following day while other Australian divisions captured a large part of Péronne itself. Rawlinson later described it as the greatest military achievement of the war.
St Quentin canal

Australian infantry study a mocked-up battlefield in preparation for the attack at Messines in 1917.
The capture of Mont St Quentin and nearby Péronne is particularly important as an example of the competence, professionalism and, above all, versatility of the fighting unit the Australians had become. The area of the mount and the town was a significant barrier to their ongoing advance. However, there was another even more difficult barrier in their way. That was the Hindenburg Line, a strong defensive system began by the Germans in late 1916 and undergoing more or less continual improvement since, even though it had been left far behind in the advances of the German Spring Offensive. This fortified line confronted the Australians with an entirely different problem from that faced at either Amiens, Mont St Quentin or Péronne. The defences of the Hindenburg Line were truly formidable – the “line” was in fact a series of deep, interconnected trenches, dug-outs and concrete machine-gun emplacements ten miles deep. There were as many as eight or nine belts of barbed wire many yards deep in front of the trenches. The St Quentin canal had been included in the defensive system – to break it here meant crossing a canal 35 feet wide [10 metres], six to eight feet deep [two to three metres], with near-perpendicular sides up to 50 feet [15 metres] high. By 1918 the Hindenburg Line was the best defensive network the German army could offer.
On the way through the deep miles of the Hindenburg Line, the obvious place to attempt to cross the St Quentin canal was over the top of the Bellicourt tunnel, a three-mile-long Landbridge over the canal itself. However, this was not necessarily an easier task than crossing the canal. The Germans could garrison as many as two divisions of troops inside the tunnel on barges, and they had the option of myriad exits tunnelled to the surface. Intelligence available to Fourth Army at the time indicated that the German garrison was determined not to give up any ground unless forced to – and there was certainly good reason not to. This was the last well-developed defensive system the Germans had on the Western Front: from here on there was nothing the allies had not broken before.
In late September the attempt to breach the Hindenburg Line began in earnest. If Amiens was war writ large, the attack on the Hindenburg Line was war on an epic scale. One thousand allied guns, amassed on a 19-kilometre front, fired a destructive bombardment that lasted 56 hours. Unlike preliminary bombardments of years gone by, this deluge of explosives had the benefit of being fired from guns that could be accurately ranged onto their targets. The artillery cut the barbed wire entanglements to shreds. Long-range batteries fired at villages, strongpoints, roads and supply dumps behind the lines to disrupt German activity. Counter-battery fire was devastatingly accurate: the German artillery was almost completely silenced. On all British fronts, 28 September saw the highest expenditure of ammunition by the British for the entire war. Almost a million shells – 25,000 tons – were hurled at the Germans in a little over two days.
Infranty
 +
+
But without the infantry, firepower alone could not win the day. Men had to advance through this maelstrom to take the ground from the enemy or it was to no avail. The Australians were given the task of breaching the Hindenburg Line across the Bellicourt Tunnel, and were given two American divisions to help do it. However, the attack launched at 6.20 am on 29 September 1918 was not straightforward. The American divisions had been given the task of capturing the Hindenburg Outpost Line in a preliminary operation two days earlier, but had failed to capture their objectives in some places, leaving their jumping off position for the main attack in doubt.
The American divisions were assigned the first part of the attack, with the Australian infantry to leapfrog through and complete the breach of the line. But when the Australians entered the battlefield they found that even in the places the American infantry had reached their objectives, their advance was confused and disorganised. Worse, far too many parties of Germans remained concealed in tunnel entrances. They would come out and pour strong, unexpected machine-gun fire into the side or rear of the advancing Australian infantry. And yet the Australian infantry was extremely capable. They had entered a disorganised, confused battlefield with any number of unknown German Machine-gun nests causing unexpected casualties from unanticipated positions. But far from breaking down, they set to work reorganising the battlefield and pushing forward the advance. This was a matter of establishing strong communication to the front and rear, accurately reporting their positions as they went. They made sure all ground was absolutely clear of the enemy before advancing further, and paused to make organised attempts to clear strongpoints. In many parts of the line they collected American infantry, willing to fight but unsure how to do it in the confusion, and reorganised them, putting them under impromptu Australian command and using them as a resource.
For all that the battle of the Hindenburg Line on 29 September 1918 demonstrated the sheer professionalism of the Australian infantry on the Western Front, they were not the first through the Hindenburg Line. The British 46th North Midland Division, in a supporting operation on the right, used collapsible boats, wooden piers, life lines, scaling ladders and life belts from troopships in the English channel to get their men across the canal under cover of their monstrous barrage. They were not a division with a particularly distinguished record, or a prestigious reputation, but with the astonishing amount of firepower available to them, they only had to be competent and determined to succeed – as indeed they did.
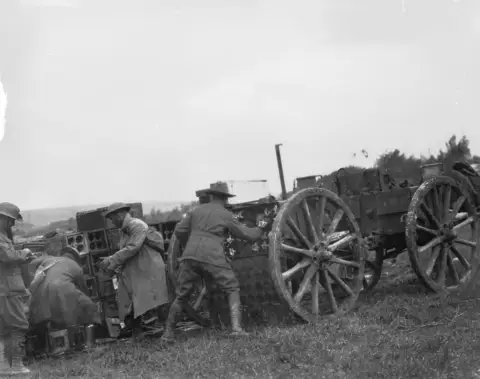
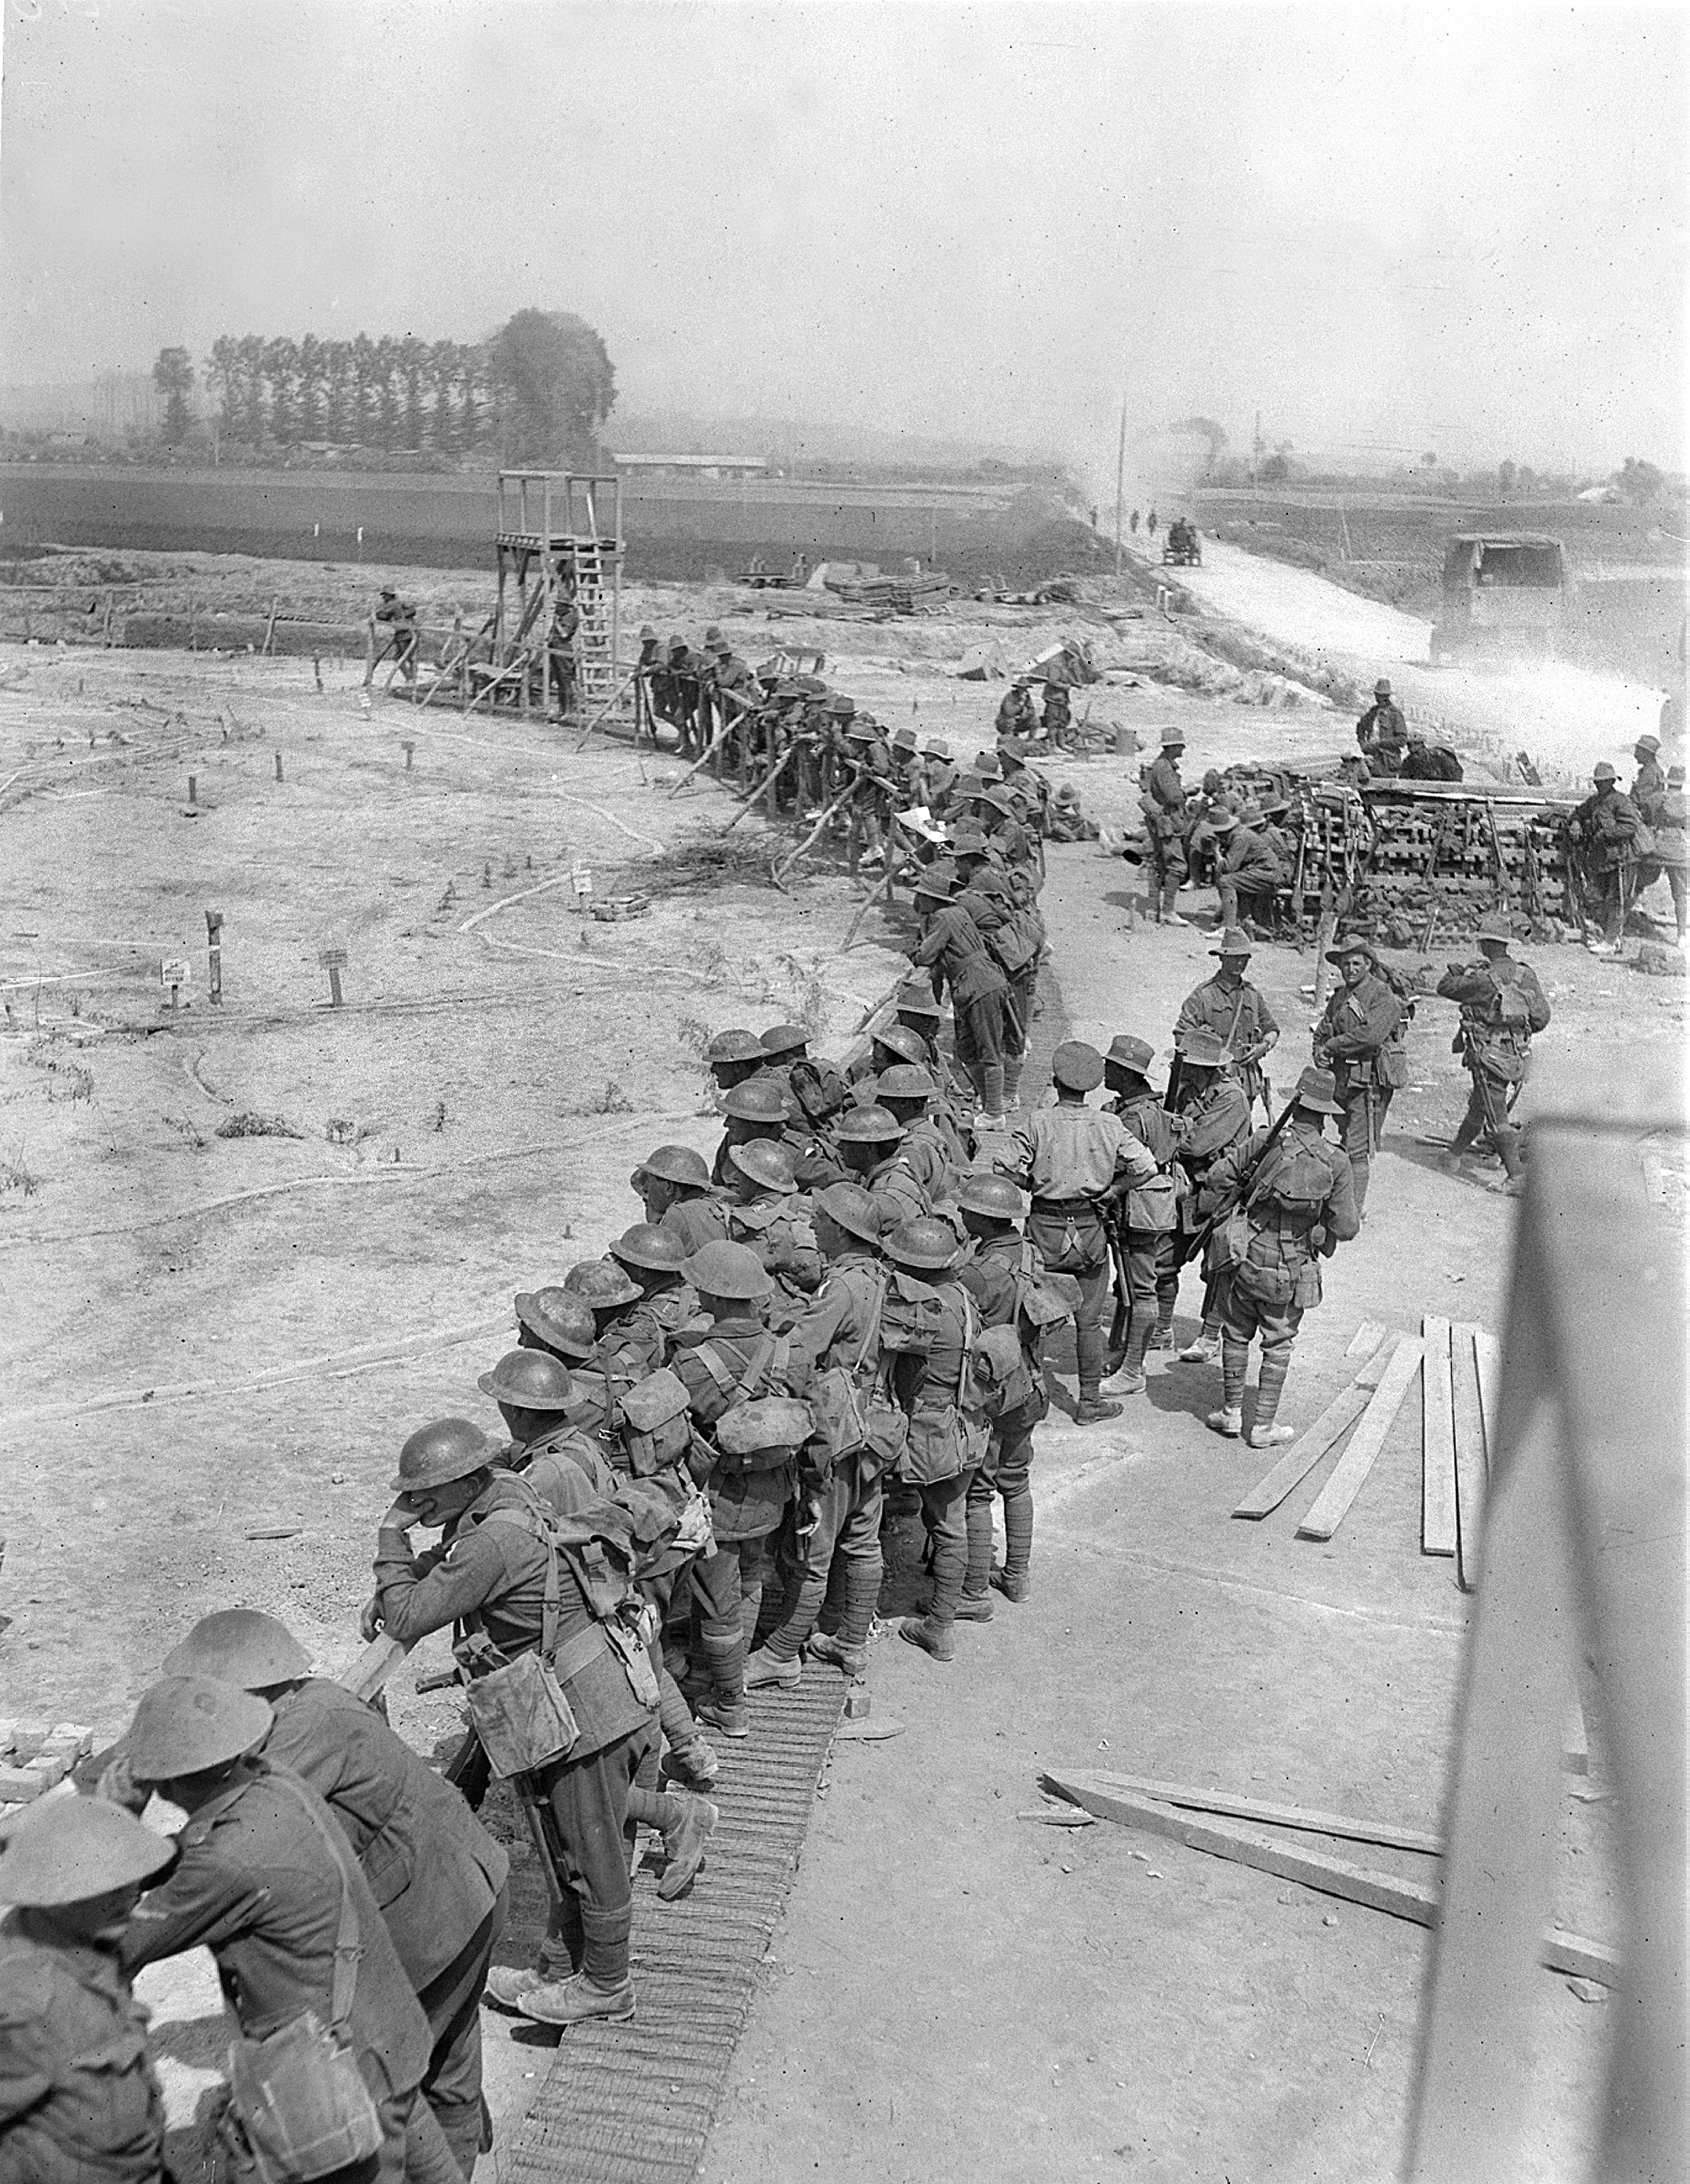
Australians loading ammunition from a dump near Hargicourt to rush to their guns in support of the 29 September attack on the Hindenburg Line. E03509
What then to make of the Australian contribution on the Western Front in 1918? They were at the forefront of many of the important British operations in their great advance that year. Yet if the Australian advance is put into context on a map (as it is on page 11), it is just one small part of an enormous advance all along the line. And it stops well before the position the line had reached by 11 November 1918. With weeks of continuous fighting, the Australian Corps was a spent force after the Hindenburg Line. Battalions were being disbanded, and after one final attack on 5 October, the corps was removed from active operations. It is perhaps harsh, but true, to say that by that time the Australians did not need to be there for an operation to succeed.
The Australian Corps of 1918 was one of the most professional and capable units available to British command on the Western Front, and it was used as such. It was at the forefront of important operations such as Amiens and the Hindenburg Line. It proved willing to fight its way forward through smaller obstacles with appropriate levels of preparation and care in between. The Australian infantry demonstrated an unending capability of adapting in the semi-mobile conditions of 1918, operating within the weapons system of combined arms with competence and undiluted courage.
But the war of 1918 was far beyond the scope of one corps. When Monash and Currie called a halt to the stunning advance at Amiens, orders were immediately issued to Third Army to prepare an attack as soon as possible to the north. And weeks before this happened, the French had made astounding gains during the Second Battle of the Marne in July. The entirety of the Western Front was on the move, one operation at a time, to inch the Germans out of France. To the north and the south they were pushed out of villages, trenches, checkerboard defences, and finally, out of the formidable Hindenburg Line. They could not stand before Australian troops, nor Canadians, British, French or Moroccan. There is no doubt that the Australians were an integral part of the British advance of 1918, but theirs was simply one contribution to a colossal endeavour.
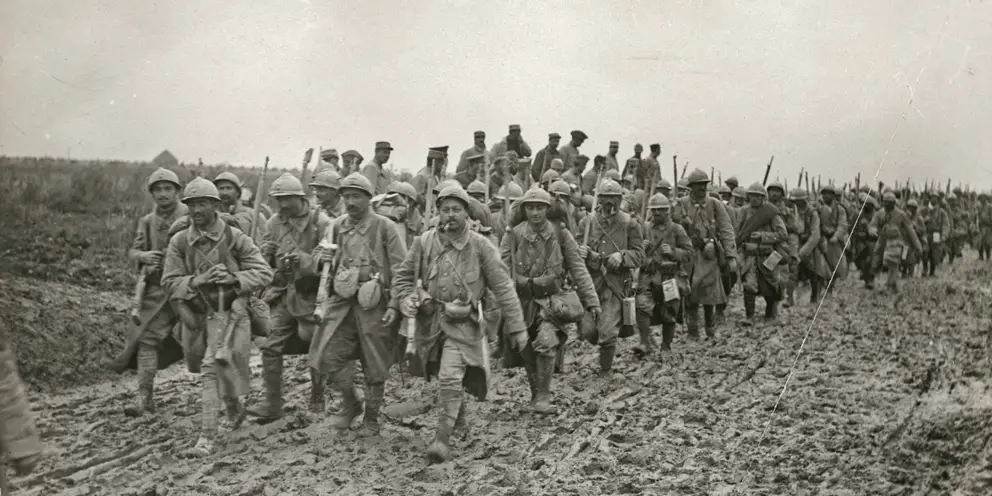
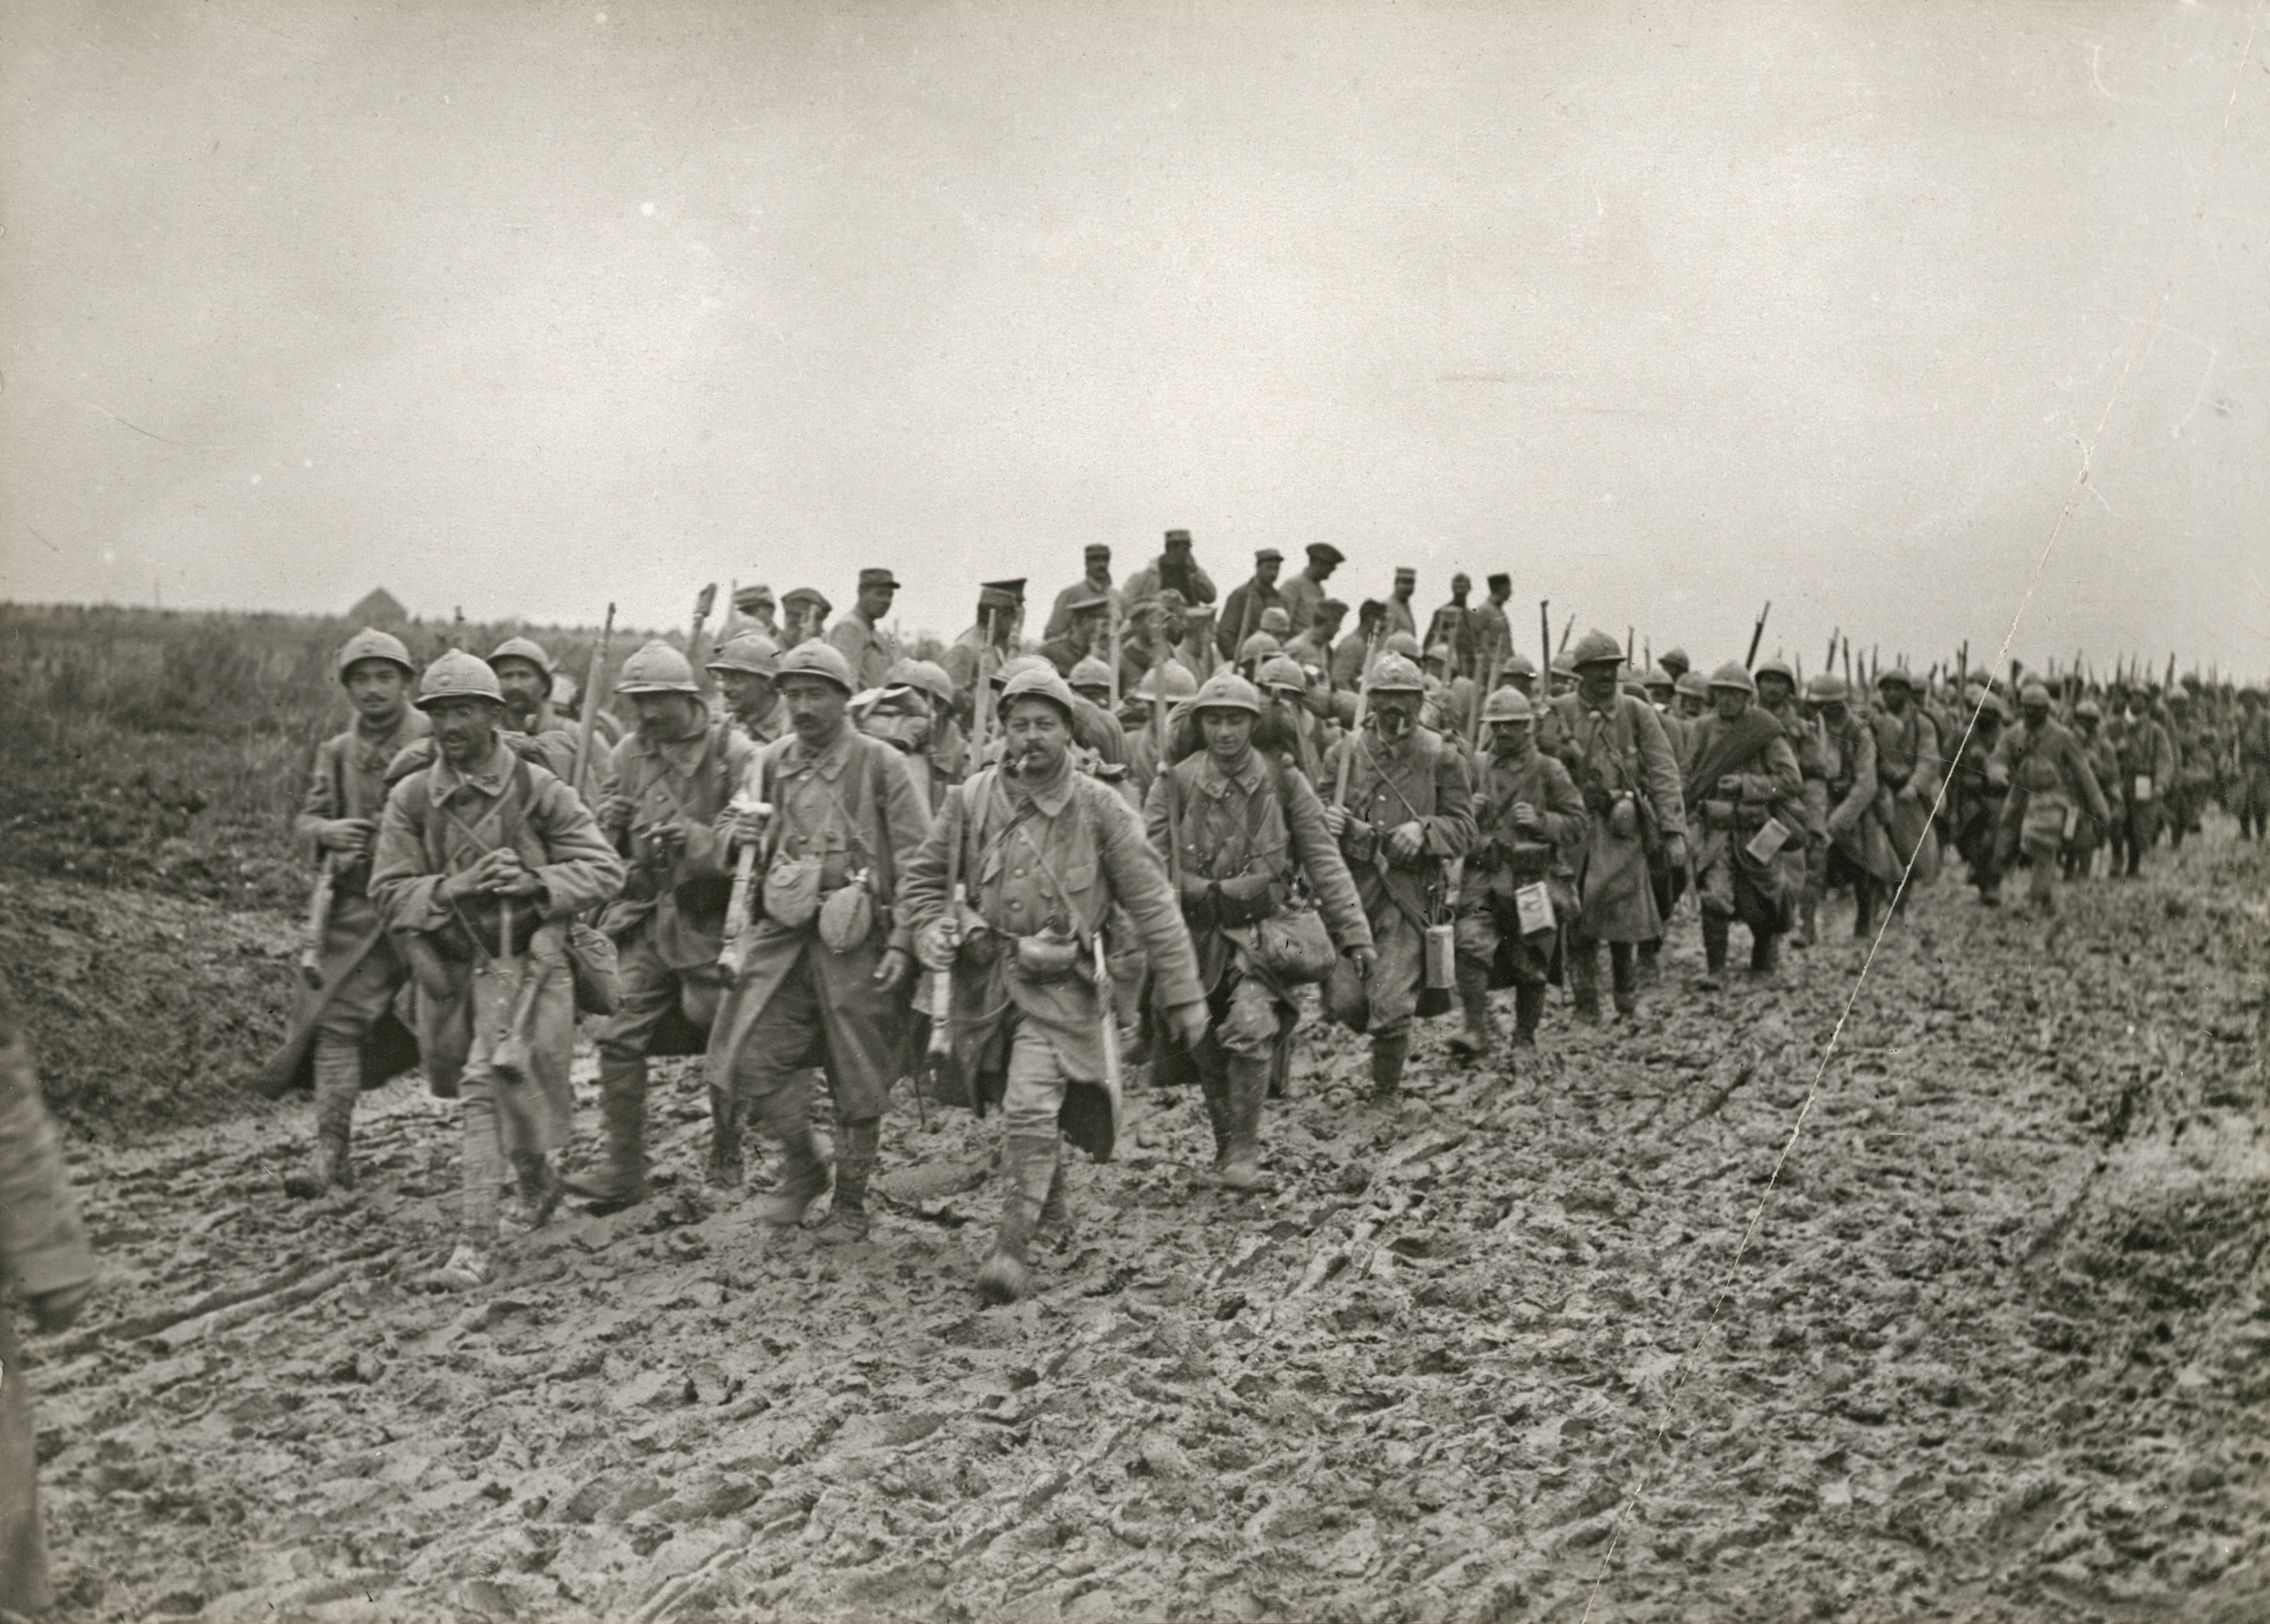
The fight was being taken up all along the line – here the French return from an operation near Etinehem. 04504
